August/September Update

For the last 2 months, I've dropped everything and put life on hold to cram for my CPA exams end of October. While I may now be a qualified makeup artist, there's still that transition period between juggling a full time job, an escalating career, and professional studies. I don't see why I can't be both a certified accountant and a makeup artist. Who else can answer your tax questions while giving you a makeover, huh? :P

Roundup of news for the last month or so:

IMATS
Flew down to my favourite Australian capital city (Sydney) a week prior to IMATS to catch up with friends, enjoy the night life, and blow my money on pretty things.


Royal & Langnickle brushes. I spent way too much time here. Their selection was quite formidable!


Hakuhodo brushes. They're like my holy grail brushes at the moment. But comes at a steep price!

Plenty of seminars and demos to sit in on. I picked up so many good tips!

Makeup student competition. One of my friends was chosen to participate. We support you, Sami!!! <3

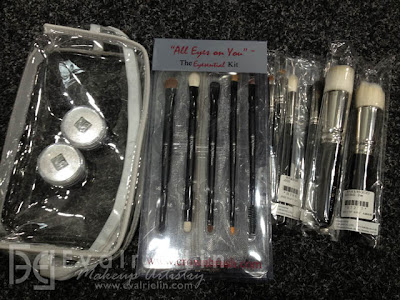
I bought a whole bunch of cosmetics back (mostly brushes), some which I haven't yet opened.

DMK Cosmetics foundation palettes and creme glace primer

Crown and Hakuhodo brushes with Ben Nye loose dust samples and clear makeup bag

Royal & Langnickle eye and face brushes

Super glittery lip glosses. I couldn't choose between the first 3 so bought all of them for $7 each!
CC and I have decided to celebrate after my exams with a ceremonial opening of our Hakuhodo brushes. Yes, they are THAT awesome! And this is prior to even using them. I had plenty of opportunity to play with the products at IMATS and spent 2 hours picking out 6 brushes. Did I also mention they're displayed on a decorated pedestal back home? Well no, but they could have! (You makeup artists will understand this brush love)

MAKEUP WORK
I've recently teamed up with Porcelain Face Makeup Artistry for makeup on weekend weddings, which suits my schedule perfectly right now. It's fantastic experience and Rachel is a great mentor, as well as a brilliant hair and makeup artist in her own right. :) I generally assist in doing makeup for the bridal party (bridemaids, mother-of-the-bride) while Rachel does all the hair styling and puts her focus on the bride.

LIFE AND OTHER THINGS
I had the good fortune to come across some very inspirational people during my recent Sydney trip. They gave me a much needed motivational kick to strive harder for my goals. It's only the start, but getting up an extra 30 to 45 minutes earlier in the morning to have a unrushed breakfast and do my makeup and hair with more care has been uplifting. Not only that, it's been a real confidence boost.

I've actually been watching Lisa Elridge's videos lately (and being blamed for overuse of our internet download quota this month). Specifically, her no-makeup makeup look is absolutely amazing. CC had previously chided me for being a makeup artist who barely wears makeup except on nights out. She's right; if anything, it's keeping up the practice (and appearance). While I've more or less come to terms with my bare face (I mean, I'm kind of stuck with it for life), it's always good to fit in more practice. So while not everyone notices the change, I feel my overall look is now fresher and more alert. 16 days until this become habit-forming! :)

xxEva

Tweet it! Facebook Digg Del.icio.us StumbleUpon Reddit RSS

Review: Zuca Artist Pro Case

Don't mind the box label. I definitely
got the Artist Pro!
I've been relying heavily on my Zuca Artist Pro since receiving it as a present from a supportive friend two months ago. There's a sad lack of airline-approved luggage dedicated to makeup, and most of the makeup cases I've see are a tad too big to bring on board. In fact, if you really want to nit-pick, the Zuca is probably a centimetre over the dimension limit for some Australian aircrafts.

In being on tour with the Supanova Pop Culture Expo team as their in-house makeup artist, I've had to travel interstate with my kit. A few criteria for luggage was required:
  • It has to be allowed on-board the flight. I hated the thought of powders being broken due to  rough handling, or lipsticks melted in the cargo hold. I don't know what goes on in there, so it's probably better to assume the worse.
  • Must be easily carried around during the convention. I hate lugging too much stuff around because it's heavy and I'm prone to leaving things behind. 
  • Well organised. The first time I travelled interstate, I chucked all my makeup in zip-lock bags within a normal luggage case. While that worked, it didn't look too professional.

My Zuca fits all my makeup and tools!
What I loved about my Zuca:
  • It fits everything! This baby holds a lot more than it looks, with a roomy interior that allows the odd buldge at the sides.
  • Multiple pockets. They've designed pockets on any side that was possible to have one.
  • The built-in seat! If only it was adjustable. Is that asking too much?
  • Clear, zipped pouches. It organises my makeup, stops them from moving around too much, and can be pulled out seperately.

What could be improved on the Zuca:
  • If only a few cms could be shaved on each dimension, it wouldn't be a struggled to fit in on airline overhead storages. I had to store my Zuca lengthways as the sloping overhead doesn't accept it in any other position.
  • Weight. With a carryon baggage limit of 7kgs, an empty Zuca already measures in at around 4kg. I've had to pull a few pockets out and discretely cram them into my shoulderbag as airline staff insists on measuring the Zuca on every flight due to it being a 'hardcase'. Most of the weight is due to the metal frame, which is there to hold up the built-in seat. However, I'd rather not have the seat in exchange for a lighter soft case.
  • Prone to tipping when going over bumps and down ledges. I've found the Zuca is prone to twisting and tipping to the side due to the narrow width between wheels. If the wheels and handles were installed on the longer width (the way most suitcases are), this might help to stablise it.
  • Adjustable handle height. Not sure if it's just me and my short arms, but I'd prefer if the handles could be secured at certain lengths, rather than having to extend all the way.
Zuca Artist Pro comes with 4 pouches. But I only use 4:
For bases, lips, and eye makeup, plus one for misc tools.

My Zuca can currently hold all my makeup and I carry a large tote for my hair kit, which covers everything I need for a job. While I do recommend the Zuca, it isn't perfect. I find it's more suited to transporting my kit locally, than as airline luggage.

Other tips to consider if you're planning on getting a Zuca:
  • Never use it as check-in baggage unless there's nothing breakable in there. The soft sides of the Zuca means things inside can get knocked around. Plus there's the possiblity of scratches and damage to the metal frame.
  • Get a silver frame Zuca instead of a coloured frame. I bought a black framed Zuca, only to get the underside badly scratched going over a high ledge.  :( The paint came off to reveal the very obvious silver metal underneath.

*** Unless otherwise stated, all products are bought with my own funds and I am not affiliated with any mentioned brands or sellers. Reviews are 100% of my own opinion and experiences. ***

xxEva

Tweet it! Facebook Digg Del.icio.us StumbleUpon Reddit RSS

Graduation and Special Thanks

Announcement time!!!

After 6 solid months of long nights, no social life, juggling of work and studies, as well as the usual sweat, blood and tears (well, I did do special effects!), I'm absolutely esctatic to annouce that I am now a diploma qualified, fully fledged makeup artist! Boo-ya!

I would like to thank all those who supported me through this last half year, offering their faces, time, and encouragement as I persued my passion. Big thanks to my trainers at the Academy of Makeup, who while shared their knowledge and experiences, provided me with the inspiration and motivation to pass all my assessments and make a start in the industry. Your threats worked well.

Special thanks goes to my models:  Chichi, Lydia, Annie, Sabrina, Silvia, Sheree, Jojo, Maz, Tash, Kathy, Sharmane, Angie, Caroline, Fu, Ed, Rai, Rhys, and my wonderful siblings (who agreed to be models without too much begging). I appreciated the time and patience you offered, as well as the opportunity to get way too accquainted with your faces. I think we've just stepped up to the next stage in our relationship. My apologies if I've left out naming anyone. Your precence was appreciated and I wouldn't have passed my course without you!

Finally, much love and thanks goes to my brilliant fellow student makeup artists. We've been through so much together in the last few months and it was hard to hold tears back as we left the building for the last time. I hope you guys succeed out there and that we keep in touch. Even though you're all competition, you're still all my friends. There will be times when we'll have to call on each other to tackle the big jobs! So if anyone lands on the next big Hollywood film set, you have my number. :)

The exprience has been absolutely amazing at the Academy of Makeup and I will not hesitate to point all aspiring makeup artists down Burnett Lane's dark alleyway.

xxEva

Tweet it! Facebook Digg Del.icio.us StumbleUpon Reddit RSS

Makeup School: Day 59 - Drag Makeup

Drag makeup
Surprisingly, I was easily able to find a model for this session and more than a few boys were up for it. I'm guessing guys must have some sort of curiousity with being in drag. It's usually so taboo, right? But looking beyond the prejudice and stereotype, you'll realise there are some guys out there with incredible makeup skills!

So the focus of the makeup seems to be lavish colours and OTT everything. Not only is it trying to smooth out masculine features, but also to keep it glamourous and beautiful. For those being in drag often, the guys would generally be clean shaven with no eyebrows. This makes it easier to draw false brows on.

As it wasn't recommended to shave my model's eyebrows, I had to block them out with wax before drawing them back in at a higher position. Why higher? This gives the illusion of more space under the brows, as per feminine features.

Glamour and socket eye technquies are perfect for drag looks. I kinda did a combination; defining a socket and blending out the corners. Bright blue eyeshadow was packed on under glitter, with plenty of shimmer on the 'brownbone' and top and bottom false lashes. That's the other thing about drag makeup: they love glitter, love shimmer, and love big false lashes.

It really helped that my model had softer features and not much facial hair. So much easier to work with! Finally, I added a wig and his transformation into a glamourous drag queen was complete!

xxEva

Tweet it! Facebook Digg Del.icio.us StumbleUpon Reddit RSS

Makeup School: Day 51-57 - Period Makeup

1940s makeup with
Veronica Lake-esque hair
The last century has had drastic changes in fashion and style, ranging from the demure and muted to loud and colourful. I was lucky (?) to have just missed the crazy eighties, and grew up as part of Gen Y. While there are still clothes I wouldn't be caught dead in again, I don't feel fashion for the 90s and 00s were as clearly defined as those in the last few eras.

Here's a quick run through of the main focus for makeup and hair of the era:

1920s
Makeup: Thin brows, black/brown eyes, orange/red/deep rose lipsticks
Hair: Short bobs, pageboy styles, finger waves, pin curls, spit-curling

1940 victory rolls
1930-1940s
Makeup: Natural brows, long lashes, luscious lips
Hair: Victory rolls, Veronica Lake waves, pin curls, strong side part

1950s
Makeup: Flicked liquid eyeliner, red lips
Hair: curled, structured, hot rollers used, covered in scarves

1960-1970s
Makeup: Socket eyes, Twiggy lashes, bronzed/tanned skin, smokey eyes, nude/glossy lips
Hair: Voluminous hair, wide headbands, loose curls, straightened hair, teasing, beehives, plaited

1970s socket eye hippie chic
1980s
Makeup: Bright, bold, colourful, over the top on eyes, lips, and cheeks
Hair: Big, permed/frizzy, Madonna ponytails, crimping

I'll probably go into depth on this later, but googling comes up with plenty of inspiration and looks that defined these eras. :)

xxEva

Tweet it! Facebook Digg Del.icio.us StumbleUpon Reddit RSS

Makeup School: Day 51 & 52 - Special Effects with Prosthetics

Theatrical Cheetah makeup (pity I didn't
have ears handy)
This is the good stuff. Also the hardest-to-get-right fiddly stuff. I got my sister in for this and we giggled throughout the session because she kept making the stupidest faces and twitching her nose. :)

The prosthetic pieces I used was a bald cap and a foam latex 'Rabbit Nose' that felt floppy and delicate. Oh, and it stinks, according to my sis. She had to breathe through her mouth for a while...

To stick it to the face, all you need is to dot Pros-Aide (liquid) Adhesive all around the back edges of the latex (don't cover the whole back with adhesive or you'll have a fun time with removal and your model will hate you.

Rabbit Nose foam prosthetic
The edges can be later smoothed down with Pros-Aide Cream Adhesive so that they blend into the face.

Prosthetic pieces can range from low-grade pre-made types (which was one I used), to high-end custom pieces. The low-grade ones would be more suited to theatrical work, where the audience is at least a few metres away and no one could tell if there's a bit of unevenness around the edges. This will not be acceptable with TV and film, especially with the introduction of High Definition (HD) screens.

xxEva

Tweet it! Facebook Digg Del.icio.us StumbleUpon Reddit RSS

Makeup School: Day 50 - Special Effects with Wax

Recreating Billy the Saw doll
In all honesty I'm not much of a special effects girl. I'll do it and I can do it well, but I just prefer to make people pretty.

Or creepy. I like creepy. It's a much more subtle and effective to give that skin crawling feeling rather than an all out, puke-everywhere-gross look.

And what's more creepy than the Saw doll? :D I have no stomach for scary movies, although I don't mind the Saw series. Apparently, seeing people manipulated, mind-f**ked and tortured doesn't disturb me or trigger any phobias. But seeing a CG ghost on screen will keep me up all night. Go figure.

Given the lack of readily available latex prosthetics, we were taught how to mould wax to the skin and change facial features.

In this instance, I've added wax prosthetics on the eyebrows, cheeks and chin. I had no red contact lenses handy so I just painted the eyes directly on the model's eyelids and asked her to close them to recreate the staring gaze of Billy.

Half-half look created with airbrush,
wax, and ageing with creams
Wax is also a pain to work with. If you touch it too much it goes too soft, sticks to everything, and won't hold its shape. The heat of the skin also makes it peel off after a while, so it'll only be good for about an hour or two. Wax is also not recommended for continuity unless you can get the application on exactly the same every time. But for a quick mock-up, it's pretty good.

Tip: Cover your fingers with Vaseline or Pawpaw ointment before handling the wax. This prevents it sticking to your fingers and makes it easier to smooth out fingerprints.

xxEva

Tweet it! Facebook Digg Del.icio.us StumbleUpon Reddit RSS

Haul: Estée Lauder Corporate Warehouse 2

Sorry for the overdue post. Decided to head back to the Estée Lauder Corporate Warehouse since they gave me and a girl friend another pass for June in my May visit.

I anticipated a stock over-hail given the amount of stocktake sales on, but it was disappointed to see they had not. Might have been better to visit in July when the sales are all over?

Much of the items were the same, although they did seem sold out of the repair serums I got last time. This haul is nowhere near the amount I found last time and I probably won't be heading back for a while.

Here's what I picked up:

Product
RPP
Price
Estée Lauder Hydrationist Maximum Moisture Lotion (50mL)
$75
$45
Estée Lauder Double Wear Maximum Cover Foundation in Very Light (30mL)
$68
$41
Bobbi Brown Long-Wear Gel Eyeliner in Black Plum Ink
$45
$27
M.A.C Fluidline Eye-liner Gel in Avenue
$32
$19
M.A.C Eye Shadow in Creamy Bisque (Limited Edition)
$33
$20
Total
$253
$152

It took me ages to select my products again. We were in there browsing for at least two hours, but I'm pretty happy with everything I managed to grab.

Now I've promised myself no more makeup purchases until Sydney's IMATS in September.
Reviews to come~

xxEva

Tweet it! Facebook Digg Del.icio.us StumbleUpon Reddit RSS

Makeup School: Day 46 & 47 - Advanced Airbrushing

What can airbrush do? Contrary to what you might think, airbrushing is not just for applying foundation. In fact, if you're shelling out good money only to get your foundation airbrushed, then you just got ripped off. Any makeup artist that advertises airbrushing but only use it to apply foundation is technically false advertising.

Here's what you should get for the full airbrushing experience:

  • Concealing (this may be done prior to foundation the traditional way using spot concealing techniques)
  • Foundation (with further spot concealing using airbrush if necessary)
  • Highlighting
  • Contouring
  • Blush
  • 3-colour eye makeup (colour wash, shadow, outer corners)

Airbrushing can also be used to define brows and apply eyeliner. However, personal experience has found this to be too invasive on the sensitive eye area. Not only will the eyes be blasted with cold air, but there is a slight gritty sensation when product is sprayed on the eyes. Why make your model uncomfortable when traditional methods will work just as well (if not better)?

I love the airbrush for its endurability...if you use silicone-based products (aqua-based will sweat off instantly). Not only did my makeup survived a day of moving outdoors, eating, absentminded touching of the face, and other abuse, it didn't come off until I swiped it with makeup remover. As airbrushing uses such minimal product, there was a surprisingly little amount to remove.

Feedback from people with sensitive skin have reported slight rashes and irritation if airbrushed makeup is left on too long. However, I've had no problems so far on all my models (including myself), but I do recommend a test patch just in case. It is also never a good idea to keep makeup on for more than a day. While we all know how bad it is to leave your makeup on overnight, if you're desperate (5am starts, anyone?), airbrushing will definitely last the night (still not recommended tho!).

xxEva

Tweet it! Facebook Digg Del.icio.us StumbleUpon Reddit RSS

Nail Art: Midnight Spot Lights

Among the bottles of Skinfood Nail Vita polishes a girl friend lent me, I found this fabulous dark red with a subtle aubergine glitter. Unfortunately, it didn't go on as well as I hoped as the polish was drying up and the glitter was barely noticeable once applied. In fact, my OPI Rapi-Dry top coat covered up what little glitter that showed through and made the polish look goopy and black.

Oh well.

The design was inspired by waving, criss-crossing movie premiere spot lights against a purply night sky.

Products used:
  • China Glaze Strong Adhesion Base Coat
  • Skinfood Nail Vita VI407 Puppy Purple
  • OPI Rapi-Dry Top Coat
  • Silver nail strips
  • Silver 3mm rhinestones


xxEva

Tweet it! Facebook Digg Del.icio.us StumbleUpon Reddit RSS

Makeup School: Day 43 & 44 - Basic Airbrushing

Ahh, here we go, this is what I've been waiting for throughout my course. Airbrushing! Some of you may think it's the HG (Holy Grail) of makeup, some may dismiss it as a passing fad. Whatever the case, airbrushing is a whole skill to itself and has its own pros and cons.

Essentially, you need an airbrush machine. Mine is the Temptu Pro S-One Compressor with an SP-35 airbrush gun. It's small, portable, and easy to use with a dual-action airflow. Hub Make Up has a whole kit for sale if you're interested in getting one for yourself. However, there is an even smaller (and newer!) system for sale, so if you're not thinking of using it professionally, I suggest getting a little one instead.

There is also an instructional DVD that comes in the kit. We had to watch it in class as part of their WH&S policies, but it's easy to follow.

Recreating Illamasqua's 'Throb' look
with airbrush and brush makeup
Airbrushing is all about controlling the airflow of the gun (yes, it's called a 'gun'). The SP-35 gun has two settings: push directly down to expel air, and pull back the trigger to release colour. The further back you pull, the more colour is sprayed out.

It's good practice to test on paper when starting. This helps in getting familiar with the pressure and airflow of the airbrush. I commenced with drawing circles, writing words, and using a children's colouring-in book to practice accuracy and colour within lines.

The main things to remember with airbrushing is:
  • Press gun trigger down before switching on compressor. This releases air and prevents build-up of pressure inside the machine (Supposedly. But I'm not going to test the theory).
  • Press trigger down before switching off compressor to expel all air and prevent product blockages.
  • If you can see colour coming out of the gun, you're over-spraying.
  • Learn to listen to your airbrush machine. There is a distinctive 'spitting' sound when product is released from the gun (as opposed to only air being released).
  • Be patient and let the product dry for a few minutes before spraying on another layer to build up the colour.

Oh, and do not mix aqua-base and silicone-based airbrush paints. Remember first year chemistry? Water and oil (well, silicon) doesn't mix and will clog your airbrush!

xxEva

Tweet it! Facebook Digg Del.icio.us StumbleUpon Reddit RSS

Makeup School: Day 38-42 - Wounds, Burns & Blisters

Not that I'm queasy with blood and cuts, but it certainly makes them easier to look at knowing they're fake. Cut wrists, head gashes, severed fingers, stitches and burns. Enough to make any weak stomach heave, right?

Anyway, special effects can be messy, but these classes were definitely some of the most fun. The products used were mostly the same, though:
  • Wax
  • Greasepaint
  • Stage blood
  • Scab blood
  • Latex
  • Vaseline

Again, these should be modelled after real wounds. For me, that meant a few hours researching the most horrific injury images Google could find. Good thing I did it all before dinner.

For burns, it's working with latex again (mostly on arms and hands so it does't hurt as much to rip it off later). The latex should only be applied on areas to be worked on, with the 'raw' areas coloured in with greasepaint.

Blisters are also easy to recreate. It's really just drops of Ben Nye Flesh Effects on the latex 'skin', set with translucent powder.

Have fun horrifying people. Word of warning though: unless it's halloween (and even then, use discretion), never ever allow a model to wander the streets with a bloody head gash or any other crazy SPFX makeup. It's all fun and games until the police gets involved...

xxEva

Tweet it! Facebook Digg Del.icio.us StumbleUpon Reddit RSS

Nail Art: Red Flakey with Rhinestones

Clearly I come up with the most exotic names for my nail designs. Not. Anyone want to volunteer? At least it's descriptive, right? :P

In any case, here's my current nails using OPI mini 'Red Lights Ahead...Where?' from the Holland Collection. I absolutely love love this red. It is a bright, coral-red creme that applies smoothly and is fully opaque with one coat.

I've avoided orange for years, but ever since finding out that orange colours suit me (from doing my 7 Deadly Sins: Gluttony shoot), I've been going nuts for anything in that shade spectrum.

Just goes to show it's always good to keep an open mind...

And just to spice things up a bit, I've gone for a flakey top coat. :)

Products used:
  • OPI mini Red Lights Ahead...Where (Holland Collection)
  • Australis Crystal Colour Top Coat 51077 Speck-tacular
  • Black & silver rhinestones (~2mm)

xxEva

Tweet it! Facebook Digg Del.icio.us StumbleUpon Reddit RSS

Haul: Queen's Birthday Sales

It's been about 10,000kms since I've last got my car in for servicing and I've been putting it off week after week due to my busy schedule. But finally, there was no more excuses and it was either get it in for service or gamble with it breaking down on the road somewhere.

Since my mechanic has his garage on the north side and my sis and her bf came along, I thought we'd drop by Chermside to see what we can grab from the Queen's Birthday public holiday sale (on top of all the stocktake sales!).

Here's what I picked up:
  • Valley Girl black and white lace dress with flared waist and belt
  • Collette black glitter clutch/shoulderbag
  • Collette gold necklace with glass beads
  • MOR Lychee Flower rollerball perfume oil
  • SugarBaby rollerball fragrance in Pink Grapefuit

Hrm, I didn't realise it at the time, but I pretty much bought a whole outfit. I've always wanted one of those waist-flare dresses, but never found any styles appealing until I came across this one. Plus it can easily take me from office to evening.

Despite the sales, I didn't find any super good deals and I probably shouldn't spend any more money if I'm pending another Estee Lauder warehouse haul in June. Definitely anticipating a huge influx of cosmetics left over from the June stocktake sales coming into the warehouse. :D

xxEva

Tweet it! Facebook Digg Del.icio.us StumbleUpon Reddit RSS

Nail Art: Grecian Midnight

Another one from the Skin Food range, but part of their Nail Vita collection that I borrowed off a girl friend. One of the more gorgeous blacks I've managed to come across, with a subtle midnight shimmer. However, my top coat kinda hid the shimmer and made it just look plain black. Disappointing :(

The polish was a little old, so it was a bit thick to apply, but I managed to smooth it out with the top coat.

I also bought these really nice, swirly stickers and the resulting nails made me think of those ancient Grecian urns with the black prints. :)

Products used:
  • China Glaze Strong Adhesion Base Coat
  • Skin Food Nail Vita BW701
  • Gold swirl nail stickers
  • OPI RapiDry Top Coat

xxEva

Tweet it! Facebook Digg Del.icio.us StumbleUpon Reddit RSS

Makeup School: Day 37 - Bruising

Bruising is about the easiest thing ever! The only trick is to make it look realistic. To do that, the best way is to model a bruise after real injuries.

Why not reference pictures of other fake bruises? Because like photocopies of a photocopy, details and realism are lost with every duplication.

Bruises change colour as they age. Fresh bruises are usually bright red from broken capillaries, then as the blood coagulates after a day or two, they turn blue and purple. As bruises heal, they will fade colour to brown, green and yellow.

In order to create my bruise on Mel, I used multiple colours of greasepaint, including dark red, purple, blue and yellow (around edges). It's also best to sponge on the colours and stipple in some broken capillaries.

As a general rule, makeup bruises should generally not have straight edges. But as long as the bruise matches the story of how the injury was obtained (seatbelt bruise from car accident, stick bruise from domestic abuse), straight edges can be acceptable.

xxEva

Tweet it! Facebook Digg Del.icio.us StumbleUpon Reddit RSS

Makeup School: Day 36 - Ageing With Latex

Final ageing with latex look for my
makeup assessment
By far, this is one of the more painful experiences of makeup I've had to do. As a makeup artist, it wouldn't be fair to subject clients to things I've not even tried myself. So I underwent what could be described as a face peel. Ouch~

Putting liquid latex on the skin and having it removed afterwards, all in the name of ageing and special effects was. not. fun. Not only does liquid latex gives off strong fumes that actually stung my eyes, but it was the actual purposeful wrinkling of my face that had me crying inside. We girls spend decades trying to preserve our youthful looks and here I was actively creating wrinkles!

Then there was the removal process, where we were possibly removing a layer of skin from our face in trying to unstick the dried latex.

1st attempt at ageing with latex on Cassie
To make matters worse, the skin retained temporary wrinkles after the latex removal. Being young, it unwrinkled pretty fast, but I can't help but think how many years of youthfulness this would have taken off me in consequence. :(

Thank god my assessments for this was over! Given I know how this made me feel, I'm wincing for the pain of others every time I had to put this on someone else.

The process itself wasn't that hard. I ripped a hydra sponge into little pieces and dipped them into a small dish of liquid latex. After sponging it on my hand to get the desired thickness, I then applied it to sections of a model's stretched face. The model continues to hold their skin taunt while I dry the latex with a hair dryer set to cool air, and set it with translucent powder.

2nd attempt at ageing with latex on Mel
Wash, rinse, and repeat for each section of the face.

After the whole face was covered in an initial layer, a second and potentially third layer would be done to give the wrinkles a more pronounced effect.

The powdery effect would be wiped off with Castor Sealor, blotted, and then foundation applied over the top. The look is finished off with dots of age spots, broken capillaries, whitening hair, and drying lips (toning down the red in lips).

If done well, this sort of makeup can work for film and TV. However, it's a lot hard to do wrinkle young skin, it's not as effective working on a 20yo as on a 50yo, trying to get them to look 80.

I also ruined two of my lovely powder brushes because I stupidly dipped them in the latex bowl instead of the powder bowl that was right next to it. *cries* Sure, they're just brushes, but to a makeup artist, they were my babies... :(

xxEva


Tweet it! Facebook Digg Del.icio.us StumbleUpon Reddit RSS

Nail Art: Raspberry Jelly Sandwich

Bought my first Orly nail polish at Price Line recently. They were having a clearance for $4.99 and I spotted this gorgeous pastel purple and gold dual-tone.

It turned out with more of the gold than purple, and the gold shimmers made the polish apply streaky. But nothing a good top coat can't blend out.

As always, I had to do some nail art to spice things up. I applied a stripe of OPI's Gettin' Miss Piggy With It (love the name!) from the Muppet's collection, and sandwiched it between gold striping tape on either side.

I found the 'Miss Piggy' polish a little gluggy, but 1 coat was enough for the stripe. Plus I absolutely loved the glittery effect! In my opinion, this is how a true glitter polish should be.

Products used:

  • China Glaze Strong Adhesion Base Coat
  • Orly Golden Halo
  • OPI Gettin' Miss Piggy With It (Muppets Collection)
  • Gold stripping tape
  • OPI Rapi Dry Top Coat

xxEva


Tweet it! Facebook Digg Del.icio.us StumbleUpon Reddit RSS

Haul: Estée Lauder Corporate Warehouse

I don't think I've ever spent this much on makeup since buying my initial kit! In my defence, there were irresistible discounts to be gained from a two hour raid of the Estée Lauder corporate warehouse.

A friend of mine who works for the Estée Lauder group gave me access tokens to the corporate store. As I've never been before and have heard raves about the discount, I was really excited to see what I could pick up. :)

The Brisbane store was adequately sized and I was like a kid in a candy store. However, the colour range was disappointingly lacking (mostly only the darker colours were left), which made me think they're probably sold out already. I will have to make a mental note to go during end of season stock changes.

Here's what I picked up:

Product
RPP
Price
Estée Lauder Pure Colour Gloss To Go
$65
$39
Estée Lauder Advanced Night Repair Serum (50mL)
$150
$90
Estée Lauder Idealist Even Skintone Illuminator (50mL)
$150
$89
Estée Lauder Limited Edition First Signs of Ageing Trio
$100
$63
Estée Lauder Lipstick Luxuries Collection
$75
$45
Estée Lauder Double Wear Stay-in-Place Lipstick (Stay Magnolia)
$45
$27
Estée Lauder Pure Colour Long Lasting Lipstick (Coral Fantasy)
$42
$27
MAC Dazzlesphere Smoky Berry Ornament
$65
$39
Total
$692
$419

The samples were obtained later from YSL at David Jones. They are the Forever Youth Liberator Serum, Creme, and Nutri Creme.

So all up, that was a saving of almost $300. Probably because I spent so much, the counter lady gave me another token to revisit in June. Oh dear...

Reviews to come~

xxEva

Tweet it! Facebook Digg Del.icio.us StumbleUpon Reddit RSS

Makeup School: Day 35 - Ageing With Creams

The young-at-heart Bridgitte being
made up to look like an 80yo old lady
The name is a bit deceptive here, as I didn't use cream, but mostly greasepaint and powder to achieve an aged look. Seriously. No latex, no prosthetics; purely drawn on lines and shading. The powder of makeup...

I will have to point out that this look mainly works for a theatrical effect and in no way will stand up to HD film and TV scrutiny. The lines are too obvious and over the top.

To achieve this look, I started with patchy foundation, to give the skin an uneven appearance.

Contouring is applied strongly through temples, hollow of the cheeks, smile lines, under nose and the 'jowls' of the jaw.

Next, I went spastic with wrinkle lines. Basically, the model is instructed to wrinkle every part of their face and these are exaggerated with powder shadow and greasepaint.

Don't forget that between every contour is a highlight, so use a cream shade to brighten between wrinkles.

To make the lips appear dry and wrinkled, the model pursed her lips and I gently sponged on some blue and white mixed greasepaint.

Lastly, I coloured the front teeth using Ben Nye Tooth Colour and used a mascara wand dipped in Ben Nye Hair Colour to comb through the front of the hair.

The resulting effect has turned the gorgeous 21 year old Bridgitte into an old lady. She actually got kinda depressed over this. Awww :(

xxEva

Tweet it! Facebook Digg Del.icio.us StumbleUpon Reddit RSS

Review: Revlon Top Speed Nail Polishes

About 2 months ago, Myer hosted a free express manicure outside the store for a Revlon promotion. Jia and I just happened to be shopping in the city, so we lined up to get our digits pampered. :D

Now I've not tried Revlon polishes before, but have heard good things about their Top Speed range.

The manicurist told me that, apparently, you have to use the Revlon Top Speed Top Coat with the Top Speed polishes or they won't dry. Have yet to test that theory, so not sure if that's just a sales gimmick. Anyone tried?

Much to the manicurist's delight, I chose to wear 'Grape'. She said the 5 girls before me had all wanted to wear the same, boring, red. Glad I could spice up her day.

Jia's choice was 'Jelly' - a gorgeous coral-red, which happens to be the brightest shade she's ever worn so far, but she loved it.

The colours came out exactly as per the bottles and we had 2 coats applied.

I can never tell when nail polishes are completely dry, so we spent a good 30 minutes being totally precious with our digits.

The solid colour look got boring after 2 days so I made an accent nail on the ring finger with my new, flakey Australis Crystal Colour Top Coat. The polishes kept up their 'wet' look for a few days, and mine lasted a full week before starting to really chip. Jia's lasted longer as she doesn't abuse her hands as much. :)

xxEva

Tweet it! Facebook Digg Del.icio.us StumbleUpon Reddit RSS
Related Posts Plugin for WordPress, Blogger...