Makeup School: Day 16 - Bridal

Classic wedding makeup on the smexy,
blushing 'bride', Kate (retouch free!)
While not all girls want to be a blushing bride, most will agree that their face must be utterly flawless. Remember that as the foundation of bridal makeup. It's likely a disproportionate amount of time will be spent on making sure the base is absolutely perfect. Bridal makeup is usually kept fairly natural with soft colours in pink, peach and taupe. Well-placed shimmers will also add to a refreshed, glowing look. All this does depend on a bride's personal preference and wedding theme. We makeup artists do have a responsibility to make strong recommendations against a particular request if we believe it to be unsuitable (lime green eye shadow?! ...You sure?), but ultimately it's up to our client.

You can pretty much bet that the bride will shed tears sometime throughout the day so waterproof mascara are an absolute MUST. It doesn't matter if it's not from an expensive, branded range. Remember the mascara wand from the bottle will not be used (unless you intend to gift the whole bottle to the bride), and usually that's the product's selling point. Our trainer, Jackie, swears by Maybelline's Blackest Lash mascara (both normal & waterproof formulas).

Airbrushing is gaining popularity in bridal makeup, although knowing the basics of traditional application is important. I'll review bridal makeup using airbrush down the track in a later session. For traditional bridal makeup:

  1. Cleanse and moisturise the full face. Prime eyes while letting the moisturiser absorb into the skin
  2. Colour wash a light, natural colour all over eye area up to brows. This can contain some shimmer. and can be a highlight colour. For Kate's makeup, I used an off-white creamy tone
  3. Brush on another layer in a soft pink over mobile lids
  4. Using a darker pink in the same colour family, blend as an arch shape into hollows of the eyes, just under browbone. Don't drag the arch all the way to inner corners
  5. Use a darker shade (I used dark purple and mauves) to curve from middle of top lashline to bottom of the arch on outer corners. Essentially, you're drawing a 'C' shape on outer corners with top half of the 'C' in dark pink, and bottom half in the mauve
  6. I like to brush shimmer on centre of eyelids at the bulge of the eyes. Eyeliner should be kept thin and close to lash line
  7. Brides who don't usually wear makeup are sometimes quite intimidated with eyeshadows. If that's the case, tone shadows down and apply lashings of mascara. Remember to curl first!
  8. Bar lashes can be too dramatic for wedding makeup, so it's probably best to use individual lashes. Space them about 3-5mm from each other, overlapping the ends
  9. Eyebrows should be well groomed and filled in
  10. Conceal, conceal, conceal! I've been converted to conceal on top of foundation, but I make an exception with bridal makeup as the skin is to look perfect so concealing first will give better coverage
  11. I prefer foundation to be sponged on. Brushes may leave streaks and it's too easy to apply too thick. Gradually build up layers using the sponge and flip to a clean side to soak up the excess
  12. Contour and blush all-in-one using blush shades: A darker tone on hollows and a lighter pink on apples of cheeks. Blend the colour out towards temples. Add a swipe of shimmer along highest point of the cheekbones
  13. Lips are to be lined and coloured in with liner pencil before applying lipstick. Blot and reapply at least 2 times. Put on a glossy top coat, but remember it won't last so best to ask the bride to reapply periodically


Ok, that was a very quick overview, but you probably get the gist of it. I think it's also my first time listing the steps to a complete face. Looks long, doesn't it? Any questions, please post below.

xxEva

Tweet it! Facebook Digg Del.icio.us StumbleUpon Reddit RSS

Makeup School: Day 15 - Black & White Photography

Rushed face chart. But you
get the idea...?
Our lessons so far has been largely focused on colour and colour correction, so what happens when none of that is relevant anymore? Work in shades and intensities of course!

Black and white (B&W) photography pretty much takes all our colour theory knowledge and stamps on it with monotoned madness. In a nutshell, this style of makeup is all about contour and highlighting. Revision time!

Any style of makeup is fine for B&W, but there are a few things to keep in mind:

  1. Wherever light is focued, the object will appear white or brighter, if not, the object will be dark and shadowed. There will be degrees of intensity between the two extremes in a grey gradient.
  2. Any colour can be used as long as you understand how it will look when converted to a monotone shade.
  3. Unless you're into the flat-faced look (don't laugh, I actually am! My face is so slim I'd use any way to create a fuller illusion), then always remember to contour and highlight! In B&W, you can get away with a heavier hand in the makeup. For where to contour and highlight, read back on my entry here

Shimmers are utterly beautiful when utilised correctly in B&W photography. However, word of caution NOT to put them on the T-zone as they will give the appearance of an oily face (always use matte highlights here!). Best place for them are swiped over the cheek planes, on brow bone, cupid's bow, centre of lips and in the middle of eyelids.

You can also go a lot darker for eyes and it won't look half as dramatic as will be in colour. Glamour, smokey, and socket eyes works their magic here! Make sure there is enough contrast between the medium and dark shade so gradient changes can be picked up. Blending is a priority here; uneven blending WILL show up!

xxEva

Tweet it! Facebook Digg Del.icio.us StumbleUpon Reddit RSS

Makeup School: Day 14 - Colour Fashion Photography

If you've had the experience being in front of mirrors and cameras, you've probably realised they tend to disagree with each other. What I thought was a sultry, sexy pose in front of the bathroom mirror would be interpreted as an awkward, stiff position by the camera, and vice versa. Not only that, the camera relishes in taking in my every flaw, blemish, oily shine, and wonky lip/eye lines. Hence, makeup for fashion photography must be immaculate.

Depending n the lighting, the makeup may also need to be darker, and contouring can be a little more overdone (because photos tends to flatten the face and add on another 5kgs to the body). Essentially, this class was just allowing me to choose a previously learned technique and practice doing it meticulously. Skin must be flawless, blemishes completely concealed, and colours can be more intense.

This session will be assessible in early March and we were given our assessment briefs. This provided a senario for us to create a face chart and give step-by-step detailed instructions on how to apply the makeup we have designed.

xxEva

Tweet it! Facebook Digg Del.icio.us StumbleUpon Reddit RSS

Makeup School: Day 13 - Oriental

Ok, the colours does make it hard
to see the actual technique.
Modelled by the cutie Annie
(no retouching!)
There's so much Asians in the world that it probably warrants a session on oriental makeup. Which is lucky for me, since I happen to be part of that crowd. In all honesty though, I realised the session was more of a 'the Caucasion interpretation of Oriental makeup'. Which shouldn't really have surprised me.

However, that's not to say I didn't learn anything. As with most makeup styles, the focal point is on eyes. Oriental eyes tend to be 'creaseless' or hooded. There is usually barely any socket, and lashes tend to be short, straight and downward pointing. If you're Asian and possess none of those characteristics, do know that I am insanely envious of you and your blessed genes!

Jealousy aside, here's how to make the most of your Asian features:

  1. Prime eyes all over lids. This now probably goes without saying. Quoting Napoleon Perdis, "Not to prime is a crime!"
  2. Colour wash over entire eyelid in a neutral colour. Most Asians from what I've seen (I'm speaking about Chinese, Japanese, and Koreans) tend to love shimmer. That's fine, I suppose; base colour and highlight all in one sweep.
  3. Using a fluffy brush or a rounded deer-foot eyeshadow brush, create a slanted reverse teardrop shape with the base of the teardrop on outer corners (use the brush to feel where socket is) and pointing down into your upper lashline. Don't drag the colour any further than halfway towards inner corners.
  4. Now blend it all in but stop just before the brow bone. I usually like to highlight on the browbone just to give it more prominence.
  5. Line the eyes close to lashline with dark brown or black pencil liner and smudge it out to blend into the shadow
  6. Curl the lashes before applying mascara. While some Asians may have long lashes, they're almost always without a curl. I have neither, so curling and mascara are an absolute must! (Although my lashes are so short I can skip both and reach straight for the falsies)

My super heavy smokey eyes for clubbing.
I think it makes me look like such a gyaru...
Smokey eyes are a big thing here. Essentially, this is the 'Asian smokey eye' technique. In fact, that's pretty much all I used to do. With no hollows or sockets, there's really only lashes, eyeliner and brows to play with. This was also the technique I've always done without knowing how to properly do it or why it suits. But flip open any oriental fashion magazine and you'd be amazed at how versatile this method is. Plus it doesn't just suit Asians! It's also perfect on younger girls or more mature ladies when strong and defined eyes are not desired.

We all had to bring in oriental models for this class and I managed to supply pretty much all of them! It's great to see that all the girls enjoyed themselves immensely and most of them promised to return as models for our assessment in a month's time.

xxEva

Tweet it! Facebook Digg Del.icio.us StumbleUpon Reddit RSS

Kit Building: Part 1

I decided it's probably best I finally splash out on a starter kit. My current makeup kit is dismal and I'm missing quite a few colours (like mattes, brights, and makeup for other skin tones).

After running around during my last class yelling across the room for someone to offer up a colour I'm after (Academy of Makeup provides cosmetics for in-class work), I decided it's best to just get my own. With work experience looming, this will probably be worth it. Plus I'd hate to be offered something and then rush out last minute to buy a kit.

In the words of Sami from class:
"You can never have too much makeup"


I will now concede. Despite just buying this kit, I'm still eyeing up Sugarpill eyeshadows and Lime Crime lippies (yes, I do know about that drama). What can I say? I'm a girl who likes her colours!

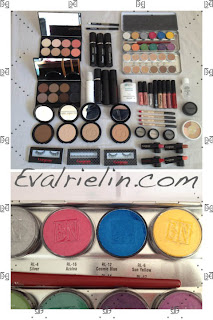
I bought the Pro Makeup Kit ($949) from Hub Makeup after spending 2 hours in store chatting with the friendly store girl, Sophie, while doing my face charts. The kit is comprised of Hub's most hot-selling products and colours so it may not always look the same as my picture. Because the Ben Nye palette was chipped from rough freight, they gave a $5 discount on the entire kit. They're also missing the 2 sold out Ben Nye foundation sticks but will replace them after the next shipment.

Essential Shades Palette


Gorgeous Cosmetics Blush/Highlight Palette
Here's what I got in my kit:

  • 6 Base Perfect Liquid Foundation in 1N, 3N, 1B, 2B, 2D, 4Y
  • 3 Powder Perfect powder foundation in #02, #08, #11
  • 1 First Base Foundation Primer
  • 1 Concealer in Medium Neutral
  • 1 Endless Summer Bronzer in #02
  • 1 Ben Nye Total Conceal-All Wheel NK-11
  • 1 Ben Nye Neutral Set Colorless Face Powder (translucent powder)
  • 1 Ben Nye Matte Foundation Palette
  • 1 Ben Nye Lumière Grande Colour Palette
  • 1 Essential Shades Palette with Monkey, Gold Digger, Fab, DMC Black, Smudge, True Taupe, Fudge, Jet
  • 1 Blush/Highlight Palette with Potato Cake, Nude, Peach Glow, Rhubarb, Natural, Toffee Shine, Sesame, Apples

  • 3 Loose Dusts in Coco, Ms Vegas, Sand Shimmer
  • 3 Madame Lash Eyelashes in Mini, Twiggies, Dual Flair (individuals)
  • 2 Eye Pencils in Black Jack, Highlite
  • 1 Cake Eyeliner Sealer
  • 1 Black Cake Eyeliner
  • 1 black mascara

  • 4 Lip Liners in Christine, Strawberry, Manhattan, Siren
  • 4 Lipsticks in Sophia, Strawberry Whip, Bridgette, Garnet
  • 3 Lip glosses in Fairy Shine, Gorgeous Rose, Pout
  • 3 Lip Lacquers in Sweetie, Lily, H2O

I am pretty happy with their selection of products and colours. One comment for improvement tho: Base Perfect Foundation shades are pretty limited and certainly doesn't cater for light skin tones. I would have liked to see more Yellow-toned (1Y or 2Y) in the selection as their Neutrals (#Ns) gives a very greyish/ashen tone. I have also never used past a 3 Y/B/N unless for contoring. I suppose that's probably why they chucked in a Ben Nye foundation palette

In any case, I now have no room in my existing makeup box to store my new haul. What had been more than substantial to contain all my previous makeup is now overflowing. Yes, that really was how limited my original makeup was. I even chucked in my nail polishes to beef it up. Now comes the dilemma of buying a proper makeup storage unit. I'm tossing up between a Zuca Artist Pro and a stackable train case. Full debate to rage.

xxEva

Tweet it! Facebook Digg Del.icio.us StumbleUpon Reddit RSS

Makeup School: Day 12 - Mature Age (50+)

Whee, I'm finally back from a whole week of holidaying in Whitsundays and it's been absolutely wonderful! Head over to my personal blog to check out the pics of me disturbing wildlife, jet skiing and doggy paddling in the sea. Yeah, it was pretty damn awesome. Holiday tip for those who want to go there themselves: Definitely buggy around Hamilton Island and frolic on Whitehaven Beach!

Now, onto makeup...

With application on mature ladies, less is definitely more! As we age, the skin loses its elasticity, becomes drier, thiner, more papery and wrinkled. There may also be discolourations with liver spots and rosacea.

The focus of makeup on older women will be on enhancing their best features and concealing blemishes on the skin. It's not purposely making them look younger, but by smoothing out the discolouration and brightening their tone through neutral makeup, this will achieve a subtle youthfulness.

Bringing out the best:

Mature-age makeup on Jan
(not retouched!)
  1. Prime eyes over eye area. The skin may be fairly loose so don't be afraid to but a finger on the brows and lift up and out. It will be very easy to get creases so it may be necessary to ask the model to blink freely during the next step
  2. Mature skin tends to be dry so I would apply a layer of moisturiser and let it absorb while working on the eyes
  3. Wash a neutral, matte colour over the entire eyelid and blend up and out just over sockets. No shimmers or pearlised eye shadows as this will emphasise all the wrinkles and folds!
  4. Use brown eyeliner to define eyes and lightly smudge
  5. Much of the time spent on mature skin is in concealing blemishes and smoothing the skin tone. Refer to my previous post on Concealer Magic to apply colour theory on concealing discolourations. Dab them on lightly as you can always build up additional layers
  6. Foundation is applied over concealer. I've actually gotten used to applying it underneath, but with older skin, it's better to use foundation to smooth out the rainbow of concealers you'd may have just applied
  7. I like to do brows after foundation just so they aren't covered up. Brows should be darkened/thickened and defined naturally
  8. A subtle blush is applied on the apples of the cheeks and dragged out towards temples. This creates lift and gives a refreshed look.
  9. Lips are lined and filled in with a neutral pencil under a layer of lipstick and a slick of gloss on top

It's such a shame I didn't manage to get a 'before pic' for comparison, but I was actually lucky to get any pics at all. I had to chase Jan (my model) down for a quick snap while she was waiting for the lift. I'm very very pleased with how Jan looked in the end. She originally had redness on the nose and surrounding areas, with an abundance of freckles. It was very much a challenge to smooth out her face while trying not to cover all her freckles in order to blend into her neck and décolletage.

I would love to be able to do more mature age makeups but in reality, opportunity would probably only come from doing mother-of-the-bride.

Next lesson: Oriental makeup. Something I'm quite interested in this myself!

xxEva

Tweet it! Facebook Digg Del.icio.us StumbleUpon Reddit RSS
Related Posts Plugin for WordPress, Blogger...